
Rucrazia's Blog
[Depth Camera] Orrbec Astra S 처음 사용기 본문
대학 병원에서 환자에게 사용할 목적으로 Depth camera를 Python 기반의 프로그램에서 구동이 필요했습니다.
저희가 사용하는 카메라로는 Orrbec 사에서 만든 Astra S 입니다. Astra S는 비싼 Depth 카메라의 저렴한 버전으로 쓰이고 있습니다.
기본 SDK가 OpenNI2를 base로 되어 있으며 C++, Java 기반으로 되어 있습니다. 홈페이지에는 Python에 대한 SDK도 지원하지만 Beta 버전이고 최신 버전 카메라만 지원하기 때문에 저희가 사용하는 Astra S는 사용할 수 없습니다. 해당 SDK를 실행해보면 계속 USB Connection 에러와 uid를 찾을 수 없다는 에러가 나옵니다.
Astra S의 경우 Python은 OpenNI2를 사용해서 구동해야 합니다. OpenNI는 XBox kinect로 개발을 해보신 분이시라면 익숙한 라이브러리라고 생각합니다.
간략한 소개는 마치고 이제 처음 사용기를 시작하겠습니다. 저의 사용기는 Windows 11기준으로 되어있습니다.
1. Astra 드라이버 설치.
https://orbbec3d.com/index/download.html
맨 밑에 있는 'Orbbec Camera Driver for Windows'를 클릭하고 다운로드 합니다.
다운로드 하면 'astra-win32-driver-버전' 압축파일을 푸시면 됩니다. 폴더 안으로 들어가다보면 'SensorDriver_버전'이 있습니다. 이것을 실행시켜 설치합니다.
Driver를 설치 완료했으면 장치 관리자에 들어가서 Astra Driver가 정상적으로 설치 되었나 확인하시면 됩니다. 정상적으로 설치되었다면 Orbbec 이라는 USB 장치가 있습니다.
2. OpenNI2 설치
사이트에 들어가시면 본인의 운영체제에 맞는 것으로 다운 받으시면 됩니다.
다운 받으시면 똑같이 압축을 푸시고 설치를 하시면 됩니다.
3. Orbbec OpenNI SDK 설치
https://orbbec3d.com/index/download.html
맨 밑에서 두 번째에 엤는 'Orbbec OpenNI SDK'를 클릭해서 다운받으시면 됩니다.
다운 받고 압축을 풀어서 Orrbec Astra S가 정상적으로 동작하는가 확인 해보겠습니다.
OpenNI_버전 -> Windows -> Tools -> NIViewer-x64 -> NiViewer.exe 실행.
정상적으로 Astra가 연결 되었다면 카메라 화면이 나오게 됩니다. 현재 Astra가 찍는 영상이 정상적으로 나오면 설정은 끝난 것입니다.
4. Orrbec Driver 파일을 OpenNI로 옮기기
3에서 설치한 OpenNI SDK 폴더를 다시 열어보겠습니다.
OpenNI_버전 -> Windows -> Tools -> NIViewer-x64 -> OpenNI2 -> Drivers 열기.
Drivers 폴더를 열게 되면 4개의 파일이 있습니다.
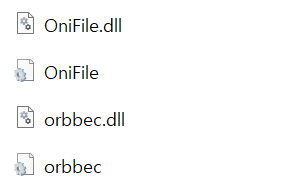
4개 파일을 모두 복사하셔서 아까 설치한 OpenNI 폴더로 갑니다.
저의 경로는 'C드라이브 -> Program Files -> OpenNI2' 입니다.
OpenNI2 -> Redist -> OpenNI2 -> Drivers 폴더 안에 붙여넣기 하시면 됩니다.
Drivers 폴더 안에 정상적으로 4개의 파일이 들어가 있는가 확인 되었으면 이제 기본 설정은 끝났습니다.
5. Python 코드 실행
pip install openni
pip install opencv-python
openni와 opencv를 설치합니다.
그리고 코드는 아래의 코드를 복사 붙여넣기 하시면 됩니다.
https://astra-wiki.readthedocs.io/en/latest/examples.html/
Examples — Orbbec Astra Wiki 2.0 documentation
Docs » Examples Edit on GitHub Examples Windows Linux SimpleViewer Build sample(e.g., SimpleViewer) $ cd Samples/SimpleViewer $ make $ cd Bin/x64-Release $ ./SimpleViewer You should now be able to see a GUI window showing the depth stream video. Here is a
astra-wiki.readthedocs.io
#!/usr/bin/python
import cv2
import numpy as np
from openni import openni2
from openni import _openni2 as c_api

# Initialize the depth device
openni2.initialize()
dev = openni2.Device.open_any()

# Start the depth stream
depth_stream = dev.create_depth_stream()
depth_stream.start()
depth_stream.set_video_mode(c_api.OniVideoMode(pixelFormat = c_api.OniPixelFormat.ONI_PIXEL_FORMAT_DEPTH_100_UM, resolutionX = 640, resolutionY = 480, fps = 30))

# Function to return some pixel information when the OpenCV window is clicked
refPt = []
selecting = False

def point_and_shoot(event, x, y, flags, param):
                global refPt, selecting
                if event == cv2.EVENT_LBUTTONDOWN:
                                print "Mouse Down"
                                refPt = [(x,y)]
                                selecting = True
                                print refPt
                elif event == cv2.EVENT_LBUTTONUP:
                                print "Mouse Up"
                                refPt.append((x,y))
                                selecting = False
                                print refPt

# Initial OpenCV Window Functions
cv2.namedWindow("Depth Image")
cv2.setMouseCallback("Depth Image", point_and_shoot)

# Loop
while True:
                # Grab a new depth frame
                frame = depth_stream.read_frame()
                frame_data = frame.get_buffer_as_uint16()
                # Put the depth frame into a numpy array and reshape it
                img = np.frombuffer(frame_data, dtype=np.uint16)
                img.shape = (1, 480, 640)
                img = np.concatenate((img, img, img), axis=0)
                img = np.swapaxes(img, 0, 2)
                img = np.swapaxes(img, 0, 1)

                if len(refPt) > 1:
                                img = img.copy()
                                cv2.rectangle(img, refPt[0], refPt[1], (0, 255, 0), 2)

                # Display the reshaped depth frame using OpenCV
                cv2.imshow("Depth Image", img)
                key = cv2.waitKey(1) & 0xFF

                # If the 'c' key is pressed, break the while loop
                if key == ord("c"):
                                break

# Close all windows and unload the depth device
openni2.unload()
cv2.destroyAllWindows()
정상적으로 실행이 된다면 화면이 보입니다.
'기술 - Coding > Python' 카테고리의 다른 글
| [Tensorflow 2] 디버깅 - UnboundLocalError: local variable 'logs' referenced before assignment (0) | 2020.06.17 |
|---|---|
| Python과 Pycharm 설치 방법 (2) | 2018.08.24 |
